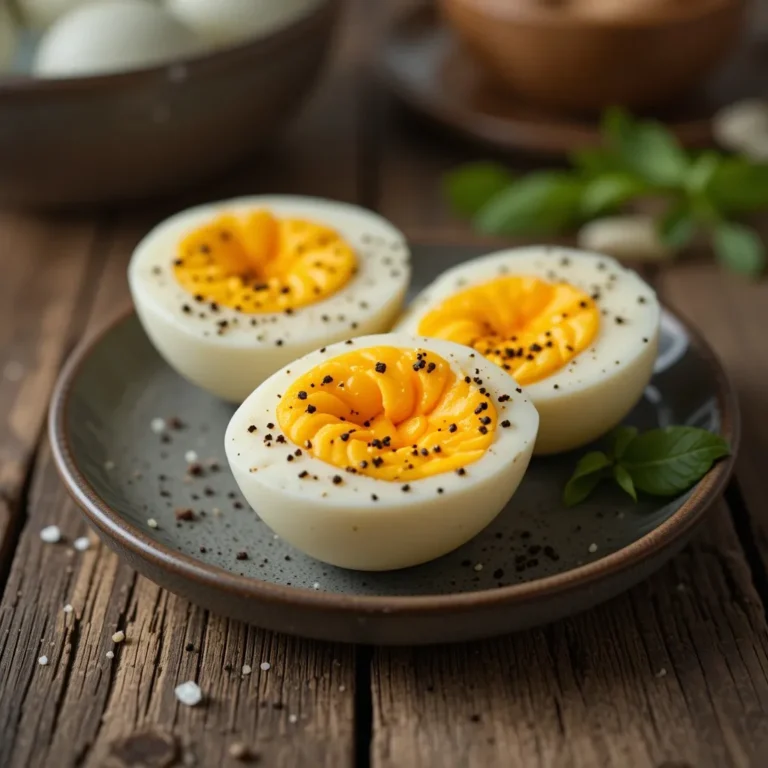
Air Fryer Eggs in Silicone Cups You Can Make in 15 Minutes
Imagine waking up to perfectly cooked, fluffy eggs with zero mess and minimal effort. That’s exactly what you get with air fryer eggs in silicone cups! This method creates beautifully portioned eggs that are tender, customizable, and ready in under 15 minutes.
I discovered this technique on a hectic Monday morning when my stovetop was occupied, and honestly, I haven’t looked back since, but even faster. Whether you’re meal-prepping for the week or feeding hungry kids before school, these silicone cup eggs will transform your breakfast routine forever.
What Are Air Fryer Eggs in Silicone Cups?
Ever wonder why the simplest kitchen hacks are often the best kept secrets? Air fryer eggs in silicone cups are exactly what they sound like—eggs cracked into individual silicone molds and cooked to perfection in your air fryer. No flipping, no watching, no stress. It’s like having a personal breakfast chef who never makes mistakes!
You know what they say: “the way to a man’s heart is through his stomach,” but I’d argue the way to anyone’s heart is through a perfectly cooked egg that didn’t dirty a single pan. Ready to revolutionize your mornings? Let’s get cracking!
Why You’ll Love This Air Fryer Eggs in Silicone Cups Recipe
Foolproof Perfection Every Single Time
The air fryer’s circulating heat cooks eggs evenly from all sides, giving you restaurant-quality results without the guesswork. No more runny whites with overcooked yolks or rubbery disasters. The silicone cups create individual portions that cook at the same rate, so whether you’re making two eggs or eight, they all come out identical. The gentle heat produces eggs with a tender, custard-like texture that’s absolutely dreamy.
Budget-Friendly Breakfast Solution
Making breakfast at home saves serious money compared to drive-thrus or cafés. A dozen eggs costs just a few dollars, and silicone cups are reusable for years. You can customize each egg with different mix-ins—cheese, vegetables, herbs, or cooked meats—without breaking the bank. It’s similar to my air fryer frittata bites recipe but even simpler since you’re working with individual servings from the start.
Endless Flavor Combinations
This is where creativity shines! Add shredded cheddar. Toss in sautéed spinach and feta for a Mediterranean vibe. Mix in diced peppers, onions, and a pinch of taco seasoning for southwestern flair. The silicone cups hold everything together beautifully, and you can make different flavors simultaneously. Why settle for boring scrambled eggs when you can create a whole breakfast bar in your air fryer? Give this recipe a try and watch it become your weekly staple!
How to Make Air Fryer Eggs in Silicone Cups
Quick Overview
This incredibly simple recipe delivers perfectly cooked eggs with minimal effort. The air fryer does all the work while you prep lunch boxes or enjoy your coffee. The result is tender, fluffy eggs with a slightly set texture that’s never rubbery. Each egg cooks in its own silicone cup, making portion control effortless and cleanup a breeze.
Time Breakdown:
- Prep Time: 5 minutes
- Cook Time: 8-12 minutes
- Total Time: 13-17 minutes
- Servings: 4 eggs (easily scalable)
Key Ingredients for Air Fryer Eggs in Silicone Cups
Basic Ingredients:
- 4 large eggs (room temperature works best)
- Cooking spray or butter (for greasing silicone cups)
- Salt and pepper to taste
- 2 tablespoons milk or cream (optional, for extra creaminess)
Optional Mix-Ins:
- ¼ cup shredded cheese (cheddar, mozzarella, or your favorite)
- 2 tablespoons diced vegetables (bell peppers, tomatoes, spinach)
- 2 tablespoons cooked and crumbled sausage
- 1 tablespoon fresh herbs (chives, parsley, or basil)
- Pinch of red pepper flakes for heat
Equipment Needed:
- 4 silicone egg cups or muffin cups
- Air fryer
- Small whisk or fork
- Cooking spray
Step-by-Step Instructions
Step 1: Prepare Your Air Fryer and Silicone Cups
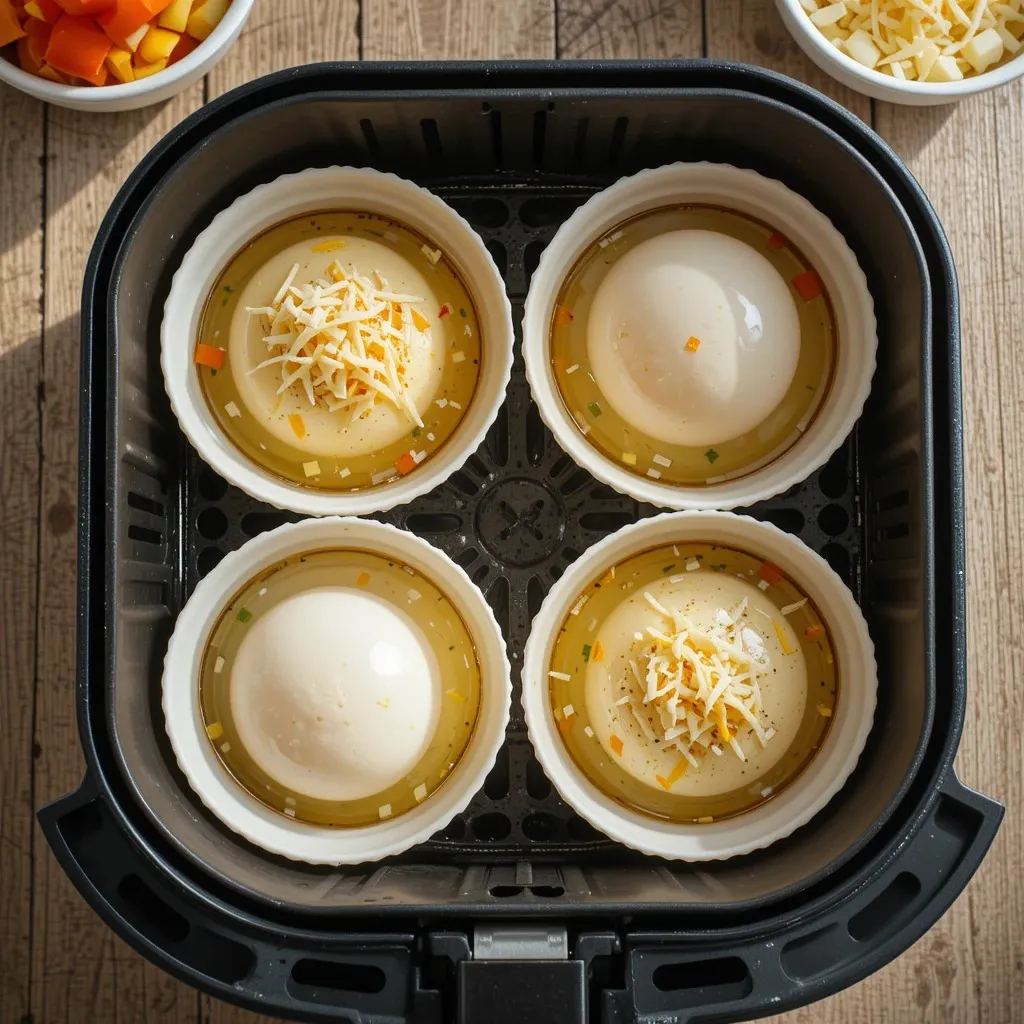
Start by preheating your air fryer to 300°F (150°C) for about 3 minutes. While it’s warming up, lightly spray or brush each silicone cup with cooking spray or melted butter. This prevents sticking and makes cleanup even easier. Don’t skip this step—I learned the hard way that even silicone benefits from a little grease! Place the silicone cups in the air fryer basket, making sure they’re sitting flat and stable.
Step 2: Crack and Season Your Eggs
Carefully crack one egg into each silicone cup. Try to keep the yolk centered and intact if you prefer it that way. Season each egg with a pinch of salt and freshly ground black pepper. If you’re using milk or cream for extra richness, add about ½ tablespoon to each cup. At this stage, you can also add your mix-ins directly on top of the eggs. I love sprinkling cheese first so it melts into the egg whites.
Step 3: Add Your Favorite Mix-Ins
This is the fun part where you customize! Distribute your chosen vegetables, meats, cheese, or herbs evenly among the cups. Don’t overfill—leave about ¼ inch of space at the top since eggs will puff up slightly as they cook. For vegetables, I recommend pre-cooking anything with high water content like mushrooms or tomatoes. Fresh spinach can go in raw since it wilts down beautifully.
Step 4: Air Fry to Perfection
Carefully transfer the filled silicone cups into the preheated air fryer basket. Make sure they’re not touching or tilted. Set the timer for 8 minutes for soft-set eggs with slightly runny yolks, 10 minutes for medium eggs with creamy yolks, or 12 minutes for fully set hard-cooked eggs. The exact time depends on your air fryer model and how full the cups are, so check after 8 minutes on your first attempt.
Step 5: Check for Doneness
After the timer goes off, carefully pull out the basket and gently touch the top of an egg with your finger. It should feel set and spring back slightly. The edges will look lightly golden, and the center should be just firm. If needed, cook for an additional 1-2 minutes. Remember, eggs continue cooking from residual heat, so slightly underdone is better than overcooked.
Step 6: Cool and Serve
Let the silicone cups sit in the air fryer basket for 1-2 minutes to cool slightly. This makes them easier to handle and allows the eggs to set completely. Use silicone tongs or a spatula to carefully remove the cups. Gently run a butter knife around the edges of each egg, then invert the cup onto a plate or pop it out with your fingers. The eggs should slide out effortlessly, maintaining their perfect shape.
What to Serve Air Fryer Eggs in Silicone Cups With
These versatile eggs pair beautifully with countless breakfast options:
Classic Breakfast Sides:
- Buttered toast or English muffins for a complete meal
- Crispy hash browns or breakfast potatoes
- Fresh fruit salad or berries for a lighter touch
- Avocado slices drizzled with olive oil and sea salt
Heartier Options:
- Warm flour tortillas for breakfast burritos
- Grits or cheesy polenta for a Southern-style plate
- Sautéed vegetables like asparagus or mushrooms
- Turkey sausage links
Beverage Pairings:
- Fresh orange juice or a green smoothie
- Hot coffee or chai tea latte
- Freshly brewed herbal tea
Make It a Meal: Stack your air fryer eggs on toasted bagels with cream cheese and smoked salmon for an elevated brunch. Or nestle them in a grain bowl with quinoa, roasted vegetables, and a drizzle of tahini sauce.

Top Tips for Perfecting Air Fryer Eggs in Silicone Cups
Use Room Temperature Eggs
Cold eggs from the refrigerator cook unevenly and take longer. Let your eggs sit on the counter for 15-20 minutes before cooking. This small step makes a huge difference in achieving that perfectly tender texture throughout.
Don’t Skip the Grease
Even though silicone is naturally non-stick, a light coating of oil or butter ensures the eggs release cleanly every time. I prefer butter for flavor, but any cooking spray works beautifully. Pay special attention to the bottom and corners of each cup.
Adjust Cooking Time by Preference
Everyone likes their eggs differently. Start checking at 8 minutes for softer eggs. If you prefer fully cooked yolks with no jiggle, go for the full 12 minutes. Write down your perfect time for next time—it varies slightly between air fryer models.
Avoid Overcrowding
Leave space between silicone cups for proper air circulation. If your air fryer is small, cook in batches rather than cramming everything in. Proper airflow is what makes the air fryer method so reliable.
Experiment with Mix-In Ratios
Too many mix-ins can prevent eggs from setting properly. Keep mix-ins to about 2 tablespoons total per egg. Dense ingredients like sausage should be pre-cooked and crumbled small. Cheese melts best when added halfway through cooking.
Invest in Quality Silicone Cups
Not all silicone is created equal. Look for food-grade, BPA-free silicone that can withstand 400°F. Thicker walls hold shape better and distribute heat more evenly. I’ve had my set for three years and they still look brand new.
Season Generously
Eggs can taste bland without proper seasoning. Don’t be shy with salt and pepper. Fresh herbs make a world of difference compared to dried ones. A tiny pinch of garlic powder or onion powder adds depth without overwhelming.
Storing and Reheating Tips
Refrigerator Storage:
Cooked air fryer eggs store beautifully for meal prep. Let them cool completely, then transfer to an airtight container lined with paper towels to absorb excess moisture. They’ll stay fresh in the refrigerator for 4-5 days. I like making a big batch on Sunday evening for grab-and-go breakfasts throughout the week.
Keep different flavors separated if you want variety. Label containers with the date and flavor type. Eggs may release a small amount of liquid during storage—this is normal. Just drain it off before reheating.
Freezing Instructions:
These eggs freeze remarkably well! Wrap each cooked egg individually in plastic wrap, then place all wrapped eggs in a freezer-safe bag. Remove as much air as possible before sealing. They’ll maintain quality for up to 2 months in the freezer.
For best results, slightly undercook eggs if you plan to freeze them. This prevents them from becoming rubbery after reheating. Freeze eggs without delicate toppings like fresh herbs, which can turn brown. Add those fresh when serving.
Reheating Methods:
Microwave: Place the egg on a microwave-safe plate and heat for 30-45 seconds until warmed through. Cover with a damp paper towel to prevent drying out.
Air Fryer: Preheat to 300°F and warm for 3-4 minutes. This method restores some of the original texture.
Oven: Heat at 325°F for 8-10 minutes if reheating multiple eggs at once.
If frozen, thaw overnight in the refrigerator before reheating for best texture. You can reheat from frozen in the microwave, but add an extra 30 seconds to the cooking time.
Frequently Asked Questions
Can I make air fryer eggs in silicone cups without milk?
Absolutely! Milk adds richness and creates a creamier texture, but it’s completely optional. Your eggs will still turn out delicious and fluffy without it. Water works as a substitute if you want extra moisture without dairy, or simply use the eggs plain.
What temperature should I cook air fryer eggs in silicone cups?
The ideal temperature is 300°F (150°C). This gentle heat cooks eggs evenly without creating tough, rubbery edges. Some people go as high as 320°F for faster cooking, but I find 300°F gives the most consistent, tender results every time.
How do I prevent eggs from sticking to silicone cups?
Always grease your silicone cups with cooking spray, butter, or oil before adding eggs. Let the cooked eggs rest for 1-2 minutes before removing them, which allows them to set completely. Running a butter knife around the edges helps loosen any stuck bits.
Can I use regular muffin tins instead of silicone cups?
Yes, but results vary. Metal conducts heat differently and may cause uneven cooking or sticking issues even when greased. If using metal, reduce temperature to 280°F and monitor closely. Silicone cups are worth the investment for this recipe.
How long do air fryer eggs in silicone cups last?
Properly stored in an airtight container, they last 4-5 days in the refrigerator. For longer storage, freeze them for up to 2 months. Always cool completely before storing to prevent condensation and sogginess.
Can I cook frozen vegetables with my eggs?
It’s best to thaw and drain frozen vegetables first. Frozen veggies release excess water during cooking, which can make your eggs watery. Pat them completely dry with paper towels before adding to the egg mixture.
Why are my air fryer eggs rubbery?
Overcooking is the main culprit. Eggs continue cooking from residual heat after removal, so take them out when they’re slightly underdone. Also check your temperature—anything above 320°F tends to create tough eggs. Adding milk or cream helps maintain tenderness.
Can I make scrambled eggs in silicone cups?
Definitely! Whisk your eggs thoroughly before pouring into greased cups. Stir halfway through cooking for that scrambled texture. The result is perfectly portioned scrambled egg cups that are great for meal prep.
Do I need to preheat my air fryer for eggs?
Preheating for 2-3 minutes ensures consistent cooking from start to finish. It’s not absolutely necessary, but you’ll get more predictable results with preheating. If skipping, add 1-2 minutes to your total cook time.
What’s the best silicone cup size for air fryer eggs?
Standard muffin-sized silicone cups (about 2.5 inches wide) work perfectly for one egg. Larger cups can hold two whisked eggs for bigger portions. Avoid tiny cups meant for mini muffins as they’ll overflow.
Common Mistakes to Avoid
Mistake #1: Skipping the Preheat
Jumping straight into cooking without preheating leads to uneven results. The first few minutes your eggs cook too slowly while the air fryer warms up, affecting texture. Those 3 minutes of preheating make all the difference.
Mistake #2: Overfilling the Cups
Eggs expand as they cook, and overfilled cups will overflow or cook unevenly. Fill cups only ¾ full, especially when adding mix-ins. Leave that space at the top for perfect, domed eggs.
Mistake #3: Using Too High Temperature
Cranking the heat seems like a time-saver, but eggs cooked above 320°F become rubbery and develop tough edges. Low and slow wins the race with eggs. Patience pays off with tender, creamy results.
Mistake #4: Not Greasing Silicone
“But silicone is non-stick!” Yes, but eggs are notoriously clingy. A quick spray prevents frustration later. Trust me, I’ve peeled apart too many broken eggs to skip this step anymore.
Mistake #5: Adding Raw Watery Vegetables
Tomatoes, mushrooms, and zucchini release moisture as they cook, creating soggy eggs. Sauté these vegetables first or pat them bone-dry. Leafy greens are the exception—they wilt perfectly without pre-cooking.
Mistake #6: Forgetting to Season
Eggs need salt and pepper to shine. Season before cooking, not after, so flavors meld into the eggs. Under-seasoned eggs taste bland no matter how perfectly cooked they are.
Mistake #7: Cooking Straight from Fridge
Cold eggs take longer to cook and can develop that weird rubbery rim while the center stays soft. Room temperature eggs cook evenly and have better texture. Plan ahead and pull them out 20 minutes early.
Mistake #8: Removing Eggs Too Quickly
Those silicone cups are HOT right out of the air fryer. Letting them rest for 1-2 minutes makes handling easier and allows eggs to set fully. Rushing this step results in broken yolks and burned fingers.
Nutritional Information
| Nutrient | Per Serving (1 egg, plain) |
|---|---|
| Calories | 70-80 |
| Protein | 6g |
| Fat | 5g |
| Carbohydrates | 0.5g |
| Fiber | 0g |
| Sugar | 0.5g |
| Cholesterol | 185mg |
| Sodium | 65mg (before added salt) |
Note: Nutritional values vary based on egg size and mix-ins added. Values shown are for basic eggs with cooking spray only.
Final Thoughts
Air fryer eggs in silicone cups have genuinely changed my morning routine. There’s something magical about opening the air fryer to find perfectly cooked, identically portioned eggs waiting for me. No splattered stovetops, no babysitting a pan, no stress.
What I love most is the flexibility. On rushed mornings, I keep it simple with just salt and pepper. When I have extra time, I create fancy combinations with sun-dried tomatoes, goat cheese, and fresh basil. My kids think they’re getting a special treat, but I know it took the same 10 minutes either way.
The meal prep potential is unreal. Sunday evening, I make a dozen eggs in different flavors spinach and feta for me, and plain ones for the kids to customize. We have grab-and-go breakfasts all week long.
If you haven’t tried this method yet, please do yourself a favor and grab some silicone cups. Your future self will thank you every single morning. And once you’ve mastered the basic recipe, come back and let me know what creative flavor combinations you’ve discovered!
Happy cooking, and here’s to easier, more delicious mornings! 🍳