Golden Crispy Air Fryer Sausage Cheese Balls – No Deep Fryin
Imagine biting into a golden, crispy ball that’s loaded with savory sausage and melty cheese—pure bliss! Air fryer sausage cheese balls are the ultimate crowd-pleaser that combines juicy breakfast sausage with sharp cheddar cheese in every delicious bite.
Here’s a fun fact: these little gems originated in the Southern United States and have been a party staple for decades! What makes this dish truly special is how incredibly simple it is to prepare—just mix, roll, and air fry. In under 30 minutes, you’ll have a batch of golden, perfectly seasoned appetizers that both kids and adults devour.
Much like our popular air fryer chicken wings, these sausage cheese balls prove that the air fryer is your secret weapon for creating restaurant-quality food at home. Get ready to become the star of every potluck, game day gathering, and holiday party with this foolproof recipe!
What Are Air Fryer Sausage Cheese Balls?
Ever wondered why these tasty morsels are called “balls”? Well, it’s quite simple—they’re literally round balls of pure deliciousness! shredded cheese and a baking mix to create perfectly portable party food.
Some folks call them “sausage bites” or “cheese balls,” but whatever you call them, one thing’s for certain: the way to anyone’s heart is through their stomach! These little flavor bombs have been passed down through generations at family gatherings, and now you can make them healthier and faster in your air fryer. Ready to roll up your sleeves and create some magic? Let’s get started!
Why You’ll Love This Air Fryer Sausage Cheese Balls Recipe
The main highlight of air fryer sausage cheese balls is their incredible texture—crispy on the outside while remaining tender and cheesy on the inside. The air fryer circulates hot air around each ball, creating that perfect golden crust without deep frying in oil. This means you get all the flavor with less fat and fewer calories!
Making these at home is remarkably budget-friendly compared to buying frozen appetizers from the store. A single batch costs just a few dollars and yields 30-40 cheese balls, making them perfect for feeding a crowd without breaking the bank. Plus, you control exactly what goes into them—no mystery ingredients or preservatives.
The flavor combination is truly unbeatable. Savory breakfast sausage pairs perfectly with sharp cheddar cheese, while a hint of garlic powder and a touch of spice from the sausage creates layers of flavor. The baking mix adds structure and a subtle biscuit-like quality that ties everything together. You can even customize the spice level or add jalapeños for extra kick!
If you loved our air fryer mozzarella sticks, you’ll absolutely adore these sausage cheese balls. Both recipes showcase how the air fryer transforms simple ingredients into irresistible appetizers. The best part? You can prepare a big batch, freeze them, and air fry them straight from frozen whenever unexpected guests arrive or you need a quick snack. Don’t wait—try making these flavor-packed bites at home and watch them disappear in minutes!
How to Make Air Fryer Sausage Cheese Balls
Quick Overview
These air fryer sausage cheese balls are incredibly easy to make and require just five simple ingredients. The savory sausage combined with melted cheese creates an explosion of flavor in every bite, while the air fryer gives them a beautifully crispy exterior without any greasy mess.
The slight spice from the sausage balances perfectly with the creamy, melted cheddar, making these irresistible to both kids and adults. One of the best features is how quickly they come together—minimal prep work and even faster cooking time mean you’ll be serving these golden beauties in no time.
Preparation Time:
- Prep Time: 15 minutes
- Cook Time: 12 minutes
- Total Time: 27 minutes
- Yield: 35-40 cheese balls
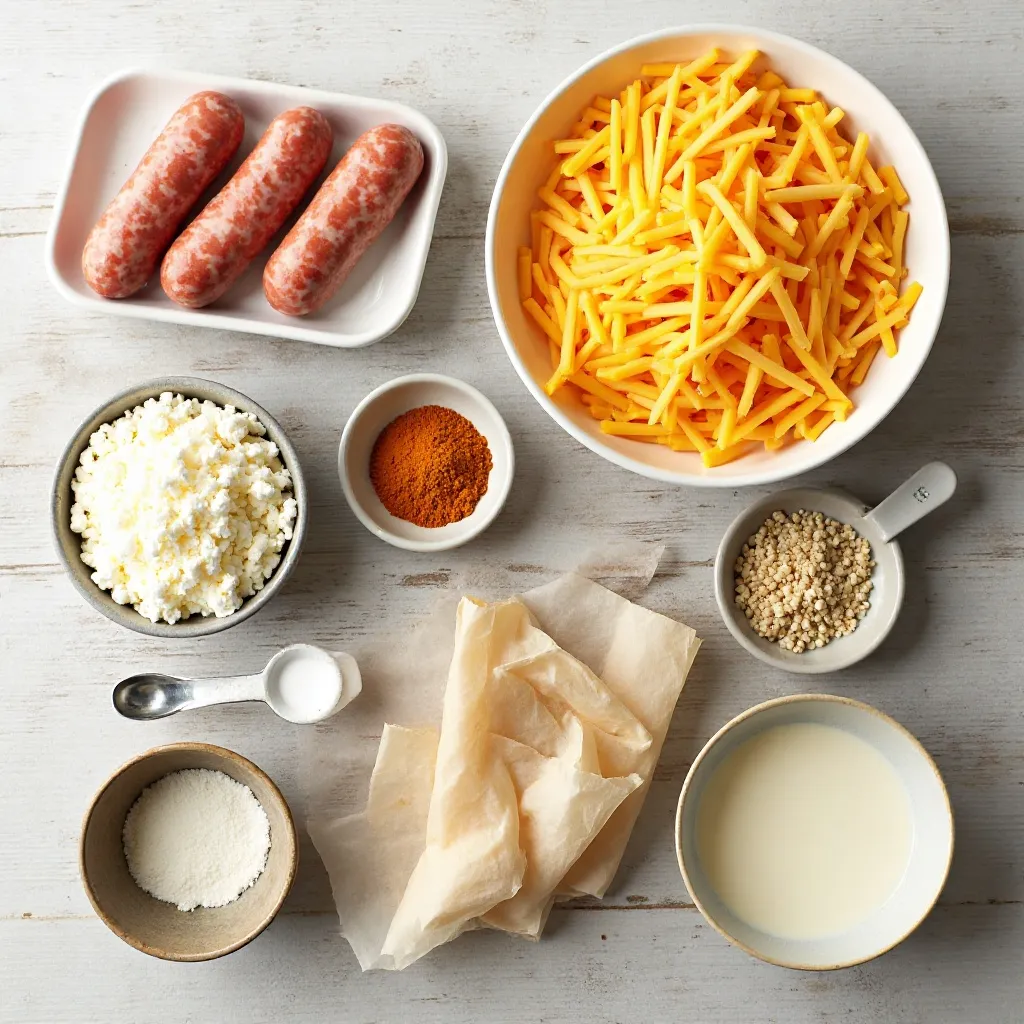
Key Ingredients for Air Fryer Sausage Cheese Balls
Main Ingredients:
- 1 pound ground breakfast sausage (spicy or mild)
- 2 cups sharp cheddar cheese, shredded
- 2 cups Bisquick baking mix (or similar baking mix)
- 4 ounces cream cheese, softened to room temperature
- ½ teaspoon garlic powder
- ¼ teaspoon black pepper (optional)
Optional Add-Ins:
- ½ cup finely diced jalapeños for heat
- ¼ cup chopped green onions for freshness
- 1 teaspoon dried Italian seasoning for extra flavor
- ½ cup Monterey Jack cheese for variety
For Serving:
- Ranch dressing
- Honey mustard
- Marinara sauce
- Sweet chili sauce
Step-by-Step Instructions
Step 1: Prepare Your Ingredients
Start by removing the cream cheese from the refrigerator and letting it sit at room temperature for about 30 minutes. Softened cream cheese is crucial because it mixes much more easily with the other ingredients and ensures a smooth, even texture throughout your cheese balls. While the cream cheese softens, shred your cheddar cheese if you haven’t already purchased pre-shredded cheese. Freshly shredded cheese melts better and doesn’t contain anti-caking agents.
Step 2: Combine the Mixture
In a large mixing bowl, add the ground breakfast sausage. Break it apart with your hands or a fork into smaller pieces. Add the softened cream cheese, shredded cheddar cheese, Bisquick baking mix, garlic powder, and black pepper to the bowl. Using your hands (or a sturdy wooden spoon), mix everything together thoroughly until all ingredients are completely incorporated.
The mixture should be uniform with no streaks of cream cheese or dry patches of baking mix visible. This process takes about 3-4 minutes of mixing. The mixture will feel slightly sticky and cohesive—this is exactly what you want!
Step 3: Shape the Cheese Balls
Line a baking sheet with parchment paper for easy cleanup. Using a small cookie scoop (about 1 tablespoon size) or your hands, portion out equal amounts of the mixture. Roll each portion between your palms to form smooth, round balls about 1 to 1.5 inches in diameter.
Try to keep them uniform in size so they cook evenly. Place each formed ball on the prepared baking sheet. Don’t worry if they’re not perfectly round—they’ll still taste amazing! You should get approximately 35-40 balls depending on their size. If the mixture feels too sticky, lightly wet your hands with cold water between rolling.
Step 4: Preheat the Air Fryer
Preheat your air fryer to 370°F (187°C) for about 3-4 minutes. Preheating ensures the cheese balls start cooking immediately when placed inside, which helps them develop that crispy exterior while keeping the inside moist and cheesy. Different air fryer models may vary slightly in temperature, so adjust if needed based on your specific appliance.
Step 5: Arrange in the Air Fryer Basket
Lightly spray the air fryer basket with cooking spray or brush it with a thin layer of oil to prevent sticking. Arrange the cheese balls in a single layer in the basket, making sure they don’t touch each other. Leave about half an inch of space between each ball to allow proper air circulation. Depending on the size of your air fryer, you may need to cook them in 2-3 batches. Don’t overcrowd the basket, or they won’t cook evenly and won’t get that desirable crispy texture.
Step 6: Air Fry to Golden Perfection
Cook the sausage cheese balls at 370°F for 10-12 minutes, flipping them halfway through the cooking time (around the 6-minute mark). Use tongs or a spatula to gently turn each ball over so all sides get evenly browned. The cheese balls are done when they’re golden brown on all sides, crispy on the outside, and the internal temperature reaches 160°F. The cheese should be melted and gooey inside. If they need more time, cook in 2-minute increments until perfectly golden.
Step 7: Cool and Serve
Remove the cooked cheese balls from the air fryer basket and place them on a serving platter lined with paper towels to absorb any excess oil. Let them cool for 2-3 minutes before serving—the cheese inside will be extremely hot! Serve warm with your favorite dipping sauces on the side. These are best enjoyed fresh from the air fryer when they’re at their crispiest and the cheese is perfectly melty.
What to Serve Air Fryer Sausage Cheese Balls With
These versatile appetizers pair beautifully with a variety of dishes and occasions:
Dipping Sauces:
- Creamy ranch dressing for cooling contrast
- Spicy honey mustard for sweet and tangy balance
- Marinara sauce for Italian flair
- Buffalo sauce for heat lovers
- Sweet chili sauce for Asian-inspired flavor
- Garlic aioli for richness
Side Dishes:
- Fresh vegetable crudités with hummus
- Mixed green salad with vinaigrette
- Tortilla chips with guacamole and salsa
- Crispy french fries or sweet potato fries
- Air fryer jalapeño poppers for a spicy appetizer spread
- Loaded potato skins
Beverages:
- Sweet tea or lemonade
- Sparkling water with lime
Complete Party Menu Ideas: Serve these alongside buffalo wings, mozzarella sticks, and spinach artichoke dip for an epic game day spread. For a brunch gathering, pair them with scrambled eggs, fresh fruit, and mimosas. They also work wonderfully as part of a holiday appetizer table with crackers, cheese, and charcuterie.

Top Tips for Perfecting Air Fryer Sausage Cheese Balls
Use Room Temperature Ingredients
Always bring your cream cheese to room temperature before mixing. Cold cream cheese creates lumps and doesn’t incorporate smoothly into the mixture. Room temperature cream cheese blends seamlessly, ensuring every bite has that creamy texture.
Don’t Skip the Preheat
Preheating your air fryer is essential for achieving that crispy exterior. Starting with a hot basket helps the outside cook quickly while keeping the inside tender and juicy.
Make Uniform Sizes
Use a cookie scoop to ensure all your cheese balls are the same size. Uniform sizing means they’ll all cook at the same rate, preventing some from being overdone while others are undercooked.
Avoid Overcrowding
Give your cheese balls space to breathe! Proper air circulation is what makes the air fryer work its magic. Cook in batches if necessary rather than cramming them all in at once.
Ingredient Substitutions
Can’t find Bisquick? Use any baking mix or make your own by combining 2 cups all-purpose flour, 1 tablespoon baking powder, and ½ teaspoon salt. For a gluten-free version, use gluten-free baking mix. Swap breakfast sausage for turkey sausage, Italian sausage, or even chorizo for different flavor profiles. Mix different cheeses like Monterey Jack, pepper jack, or mozzarella for variety.
Adjust the Spice Level
If you prefer milder cheese balls, use mild breakfast sausage and regular cheddar. For more heat, opt for spicy sausage, add diced jalapeños, or use pepper jack cheese. You can also add ¼ teaspoon cayenne pepper to the mixture.
Test for Doneness
The internal temperature should reach 160°F for fully cooked sausage. Use an instant-read thermometer to check if you’re unsure. The exterior should be deeply golden brown and crispy.
Prevent Sticking
Always spray your air fryer basket with non-stick cooking spray before adding the cheese balls. This prevents them from sticking and makes cleanup much easier.
Flip Midway Through
Turning the cheese balls halfway through cooking ensures even browning on all sides. Use silicone-tipped tongs to avoid scratching your air fryer basket.
Let Them Rest
Allow the cheese balls to cool for 2-3 minutes after cooking. The cheese inside is molten hot and needs time to set slightly. This makes them safer to eat and prevents the cheese from oozing out everywhere.
Storing and Reheating Tips
Refrigerator Storage
Store leftover air fryer sausage cheese balls in an airtight container in the refrigerator for up to 4 days. Make sure they’ve cooled completely before storing to prevent condensation, which makes them soggy. Place parchment paper between layers if stacking them.
Freezing Instructions
These cheese balls freeze beautifully! You can freeze them either before or after cooking:
Freezing Uncooked Cheese Balls: After rolling the balls, place them on a parchment-lined baking sheet and freeze until solid (about 2 hours). Transfer the frozen balls to a freezer-safe bag or container. They’ll keep for up to 3 months. Cook from frozen, adding 2-3 extra minutes to the cooking time.
Freezing Cooked Cheese Balls: Let cooked cheese balls cool completely, then freeze them in a single layer before transferring to a freezer bag. They’ll maintain quality for up to 2 months. Reheat from frozen for best results.
Reheating Guidelines
For refrigerated cheese balls, reheat them in the air fryer at 350°F for 4-5 minutes until warmed through and crispy again. For frozen cooked cheese balls, air fry at 350°F for 6-8 minutes. Avoid microwaving if possible, as it makes them soggy rather than crispy. If you must use a microwave, heat on high for 30-45 seconds, but know they won’t retain their crispy texture.
Make-Ahead Tips
Prepare the cheese ball mixture up to 24 hours in advance and store it covered in the refrigerator. When ready to cook, roll into balls and air fry as directed. You can also roll the balls and refrigerate them on a baking sheet for up to 8 hours before cooking—perfect for party prep!
Tips for Avoiding Common Baking Mistakes
Mistake: Cheese Balls Fall Apart
Solution: This happens when the mixture is too dry or hasn’t been mixed thoroughly enough. Make sure your cream cheese is fully softened and completely incorporated. The mixture should feel slightly sticky. If it’s too crumbly, add an extra tablespoon of softened cream cheese.
Mistake: Cheese Balls Are Dense and Heavy
Solution: Overmixing can make the baking mix develop too much gluten, resulting in tough, dense cheese balls. Mix just until combined—no more. Also, make sure you’re measuring the baking mix correctly by spooning it into the measuring cup rather than packing it down.
Mistake: Uneven Cooking
Solution: This results from making different-sized balls or overcrowding the air fryer. Use a cookie scoop for uniformity and always leave space between each ball. Cook in batches if necessary.
Mistake: Cheese Balls Are Pale and Not Crispy
Solution: Your air fryer temperature might be too low, or you might not be cooking them long enough. Make sure to preheat the air fryer and cook at 370°F for the full 12 minutes. Different air fryer models vary, so you may need to adjust temperature or time.
Mistake: Cheese Oozes Out During Cooking
Solution: If your cheese balls are leaking cheese, they might be too large or the air fryer temperature is too high. Keep them to 1-1.5 inches in diameter and don’t exceed 370°F. Also, make sure the mixture is well-combined so the cheese is evenly distributed.
Mistake: Raw Center
Solution: If the outside is browning too quickly but the inside is still raw, reduce the temperature to 350°F and cook for a few minutes longer. Smaller cheese balls also cook more evenly than larger ones.
Mistake: Dry, Crumbly Texture
Solution: This happens when there’s too much baking mix or not enough moisture from the cream cheese and sausage. Make sure you’re measuring ingredients accurately.
Mistake: Bland Flavor
Solution: If your cheese balls taste bland, you might need more seasoning. Breakfast sausage is already seasoned, but adding extra garlic powder, onion powder, or a pinch of cayenne can boost flavor. Use sharp cheddar instead of mild for more cheese flavor. Always taste your sausage first—if it’s under-seasoned, add ¼ teaspoon of salt to the mixture.
Frequently Asked Questions
Can I make air fryer sausage cheese balls without Bisquick?
Absolutely! You can substitute Bisquick with any all-purpose baking mix or make your own by combining 2 cups flour, 1 tablespoon baking powder, and ½ teaspoon salt. For a low-carb version, try almond flour, though the texture will be slightly different. You can also use crushed crackers like Ritz or Club crackers as a binder—use about 1.5 cups of finely crushed crackers.
Why are my sausage cheese balls falling apart in the air fryer?
Cheese balls fall apart when the mixture is too dry or not properly bound. Make sure your cream cheese is fully softened and thoroughly mixed into the sausage. The mixture should hold together when squeezed. If it’s crumbly, add another 1-2 ounces of softened cream cheese. Also, let the mixture rest in the refrigerator for 15-20 minutes before rolling—this helps everything bind together better.
Can I use pre-cooked sausage for this recipe?
While raw breakfast sausage works best, you can use pre-cooked sausage in a pinch. Cook and crumble the sausage first, let it cool completely, then mix it with the other ingredients. The texture will be slightly different, and you may need to add an extra tablespoon of cream cheese for moisture since pre-cooked sausage is drier.
How do I know when the sausage cheese balls are fully cooked?
The cheese balls should be golden brown on all sides with a crispy exterior. The internal temperature should reach 160°F when checked with an instant-read thermometer. They typically take 10-12 minutes at 370°F. When you cut one open, the sausage should be cooked through with no pink remaining, and the cheese should be melted and gooey.
Can I make these sausage cheese balls in a regular oven?
Yes! Preheat your oven to 400°F. Place the cheese balls on a parchment-lined baking sheet, spacing them about an inch apart. Bake for 18-22 minutes until golden brown and cooked through, turning them halfway through for even browning. They won’t be quite as crispy as the air fryer version, but they’ll still be delicious.
What’s the best cheese to use for sausage cheese balls?
Sharp cheddar cheese provides the best flavor, but you can experiment with other varieties. Monterey Jack creates a milder, creamier texture. Pepper jack adds a nice kick. Colby cheese offers a buttery flavor. For extra richness, try using a combination of sharp cheddar and smoked gouda. Avoid using only mozzarella, as it can make them too stringy and mild.
Can I add vegetables to my sausage cheese balls?
Yes, but be cautious about adding too much moisture. Finely diced jalapeños work great (about ½ cup). You can also add ¼ cup finely minced onions or bell peppers, but sauté them first and let them cool to remove excess moisture. Avoid watery vegetables like tomatoes. Frozen spinach can work if you squeeze out all the liquid first.
How can I make sausage cheese balls spicier?
Use spicy breakfast sausage as your base. Add ½ cup diced jalapeños or 2 tablespoons finely minced fresh jalapeños. Mix in ¼ teaspoon cayenne pepper or red pepper flakes. Use pepper jack cheese instead of regular cheddar. Add a dash of hot sauce to the mixture. For extreme heat, include a tablespoon of diced habanero peppers.
Why are my cheese balls greasy?
Breakfast sausage naturally contains fat, which renders during cooking. Placing cooked cheese balls on paper towels immediately after cooking helps absorb excess oil. If you’re using particularly fatty sausage, the extra grease is normal—just drain it off. Avoid adding extra oil or butter to the mixture.
Can I make mini sausage cheese balls for bite-sized appetizers?
Definitely! Mini cheese balls are perfect for parties. Use a small cookie scoop (about ½ tablespoon) to make balls roughly ¾ inch in diameter. Reduce the cooking time to 8-10 minutes at 370°F since they’re smaller. You’ll get approximately 60-70 mini cheese balls from this recipe. They’re perfect for toothpick serving!
Nutrition Information
| Nutrient | Per Serving (2 cheese balls) |
|---|---|
| Calories | 145 |
| Total Fat | 10g |
| Saturated Fat | 4.5g |
| Cholesterol | 28mg |
| Sodium | 285mg |
| Total Carbohydrates | 8g |
| Dietary Fiber | 0g |
| Sugars | 1g |
| Protein | 6g |
| Vitamin A | 4% DV |
| Calcium | 8% DV |
| Iron | 4% DV |
Note: Nutrition information is approximate and based on standard ingredients. Values may vary based on specific brands and ingredient substitutions used.
Final Thoughts
Air fryer sausage cheese balls are the ultimate appetizer that combines convenience, flavor, and crowd-pleasing appeal in one crispy package. Whether you’re hosting a party, need a quick snack, or want to impress guests without spending hours in the kitchen, this recipe delivers every single time.
The beauty of this recipe lies in its simplicity and versatility. With just five basic ingredients and minimal prep time, you can create restaurant-quality appetizers right at home. The air fryer does all the heavy lifting, giving you perfectly golden, crispy cheese balls without the mess and hassle of deep frying.
Make them ahead and freeze them for ultimate convenience, or whip up a fresh batch in under 30 minutes when unexpected company arrives. Customize the spice level, experiment with different cheeses, or add your favorite mix-ins to make them your own. No matter how you prepare them, these savory bites will disappear faster than you can make them.
So grab your air fryer, gather your ingredients, and get ready to become the hero of your next gathering. Your family and friends will be asking for this recipe again and again. Happy cooking, and enjoy every crispy, cheesy, savory bite!